

Testing Christmas Lights: What Each Multimeter Reading Actually Means
A dead string of Christmas lights is almost never a mystery once you put a meter on it. The reading across the plug tells you whether the fault is a break in the wire or a blown fuse, the reading across a single bulb separates a burnt filament from a good one, and the reading across an LED tells you whether the junction is intact. The part that confuses people is that a completely healthy incandescent string will not beep in continuity mode at all, so the meter looks like it is reporting a fault when it is reporting nothing of the kind. Once you know why that happens, the whole diagnosis takes a few minutes instead of an afternoon.
Everything below is written from the measuring behaviour of our own instruments and from the way series, shunt and series-parallel light sets are actually wired. Wenzhou Zhengyuan Electronic Co., Ltd. builds the meters used in these examples in its Wenzhou factory.
What Each Reading on a Dead String Tells You
The table is a decision aid. Find the row that matches your display, then do the thing in the third column before you start pulling bulbs at random.
| What the display shows | What it means electrically | What to do next |
|---|---|---|
| OL across the two plug pins | No DC path through the set at all | Test the fuse inside the plug first. If the fuse is good, the break is in the wire or in every bulb of the series run. |
| A steady reading of hundreds of ohms to a few kilohms, no beep | The string is continuous, and that large number is the cold filament resistance of every bulb added together | Nothing is broken. Check the plug fuse, then the wall outlet, then the socket the string is plugged into. |
| A reading that jumps as you flex the wire | An intermittent conductor, or a bulb that is not seated in its socket | Flex one section at a time. Replace the socket the reading reacts to, not the bulb nearest to it. |
| OL across a single incandescent bulb | Filament open | Replace the bulb. |
| A few ohms across a single incandescent bulb | Filament intact and cold | The bulb is good. The fault is somewhere else in the run. |
| 0.4 to 0.7 V in diode test across one LED, one polarity only | The LED junction is intact and forward-biased | Good LED. Note which way round the probes were and use the same orientation on the next one. |
| OL in both directions across one LED | Open junction, or a built-in resistor blocking the test | Reverse the probes and re-test before condemning it. LED sets with series resistors will not read like a bare diode. |
The third column matters more than the second. Almost every wasted afternoon on Christmas lights comes from skipping the plug fuse and going straight to the bulbs, because the bulbs are the part that is easy to reach.
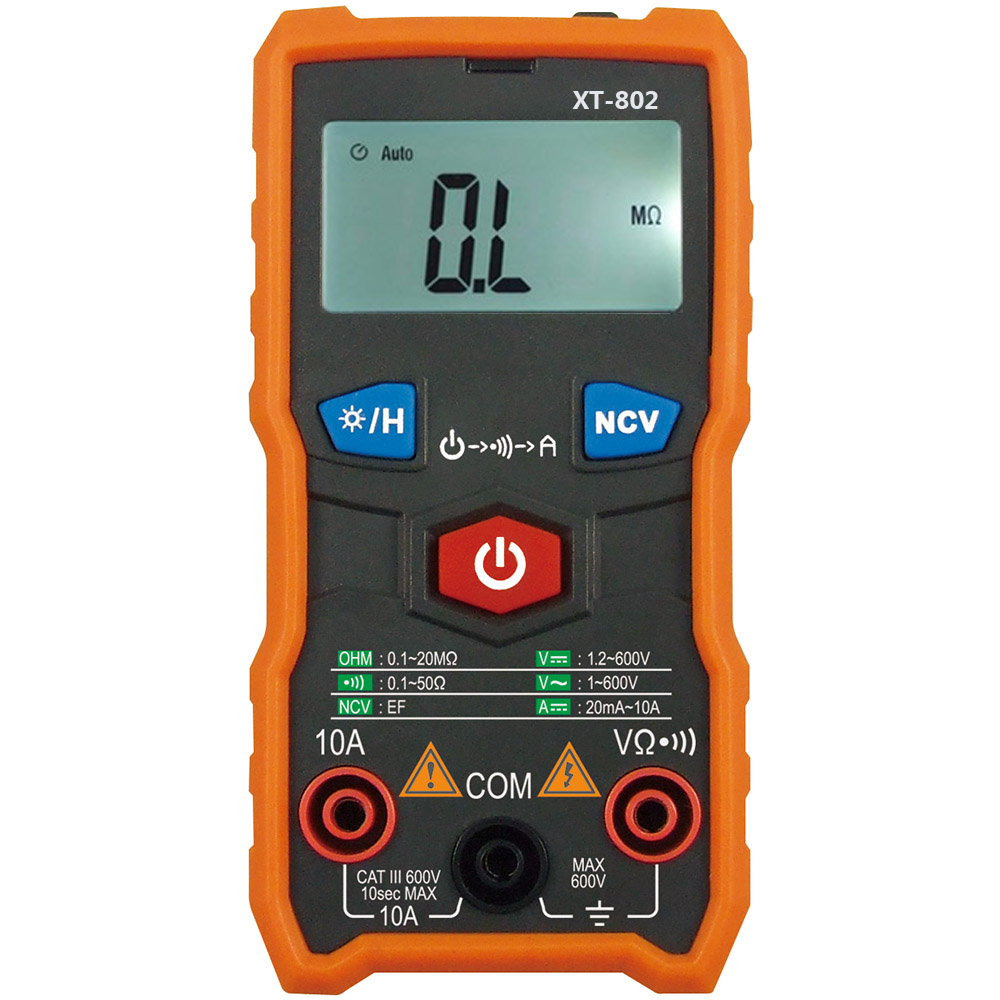
Why the Continuity Beep Stays Silent on a Healthy String
This is the reading that sends most people back to the shop to buy a new set they did not need. Continuity mode is not a measurement; it is a comparison. The meter pushes a small current through the probes, works out the resistance, and sounds a tone if that resistance falls below a threshold the meter sets internally.
On the XT802 the continuity range is printed on the panel from 0.1 to 50 ohms. Fifty ohms is a sensible upper bound for checking a length of cable end to end, because a good conductor measures far below it. A string of incandescent bulbs is a completely different object. Each cold filament sits at a couple of ohms, and every bulb in the run adds to the total, so any set with more than about thirty bulbs in a single series run already sits above fifty ohms. That is a perfectly healthy string, and the meter stays silent because the number it measured is larger than the number it compares against.
The lesson is that the beeper answers the question “is this conductor continuous”, not the question “is this string working”. When you want the second answer, leave continuity mode and measure resistance properly. The continuity readings guide covers the threshold behaviour in more detail, and the distinction it draws between a beep and a number is exactly the one that matters here.
The Plug Fuse Comes Before the Bulbs
Most plug-in light sets carry a small glass fuse inside the plug body, behind a sliding door that opens with a fingernail. It is there because a set of a few hundred bulbs is a large enough load that a fault should not be allowed to pull current until something worse fails. When that fuse opens, the set goes dark exactly as it would if the first bulb had failed, and no amount of bulb swapping will bring it back.
Open the door and look at the fuse. A good fuse shows an unbroken wire between the two caps; a blown one shows a gap or a blackened deposit on the glass. If you want the meter’s opinion instead of your eye’s, set the meter to resistance and measure across the fuse out of the plug: a good fuse reads close to zero, a blown one reads OL. This single check is worth more than the first twenty minutes of bulb pulling, and it is the first thing to do on any set that is completely dead rather than partly dead.
Series, Shunt and Series-Parallel: One Bulb, Three Behaviours
Older incandescent sets are wired in a single series run, which is why one failed bulb takes the whole string down. There is no parallel path, so the current has nowhere to go. Finding the failed bulb is the entire job, and the ordering trick of replacing one bulb and watching what happens is worth knowing, because these sets are built so that the failed bulb shows a visibly different filament.
Most later incandescent sets use shunt-wired bulbs. Each bulb has a small wire wrapped around its base that closes the circuit when the filament opens. The string stays lit after a bulb fails, which looks like an improvement until you notice the consequence: the failed bulb’s voltage is now shared among the remaining bulbs, so every one of them runs a little hotter. A set that has lost several bulbs this way tends to lose more, and the bulbs that die are the ones nearest to the shunts that have already closed.
LED sets are usually wired in series-parallel groups with a small controller in the plug or the first bulb housing. A failed group takes out a section rather than the whole string, and the controller itself is a component that can fail. That is why a dead LED set should be checked at the plug fuse, then at the controller output, and only then at individual LEDs.
Finding the Break Without Pulling Every Bulb
On a series set, the fastest non-destructive method is to halve the problem. Disconnect the set from the wall, then measure resistance across the two halves of the string at a socket in the middle. One half will read a finite resistance and the other will read OL. The OL half contains the break. Repeat on that half. Ten bulbs become five, five become two or three, and the failed bulb is found in a handful of measurements rather than fifty.
This works because the meter does not care how the set is arranged, only what sits between the probes. It fails on sets with shunt wiring, because a closed shunt makes the broken bulb look continuous, and that is the point at which bulb-by-bulb testing or a voltage tester takes over. If the half-split method keeps returning finite readings everywhere, you are looking at a shunt-wired set with a bulb that has already been bypassed.

What a Voltage Tester Adds That a Multimeter Cannot
A pen-type voltage tester is the tool for the job once the string is live and the fault is a single dark bulb in a lit run. It detects the presence of alternating voltage without a connection to a return path, so you can run it along the wire and watch where the indication stops. On a series set that is energised, the indication will be present up to the failed bulb and absent after it.
The trade is precision for convenience. A non-contact tester tells you that potential is present, not how much of it there is, and it will sometimes respond to a conductor that is not actually live because of capacitive coupling from a parallel wire. The fuse and breaker guide sets out the same discipline for household fault finding, and the guide to false beeps on dead wires covers the coupling case in detail. Treat the tester as a locator and the multimeter as the measurement, and use each for its own job.
Send Us the Readings You Took
If you are choosing meters for a workshop, a retailer’s seasonal range or a distributor’s catalogue, order a sample and run a known-good string and a known-open bulb through the procedure above, then tell us which instrument gave you the clearer answer. Send the readings you took, what your customers actually use the meter for, and the quantity you are planning. Our Wenzhou engineers reply within 24 hours, confirm whether the XT802 or the DT6222 fits the work you are equipping, and quote per-unit pricing once we have your numbers.